Open ESXCLI from your PC.
vicfg-snmp.pl --server 10.0.x.x --u root --p youresxipassword --comm PUBLIC
vicfg-snmp.pl --server 10.0.x.x --u root --p youresxipassword --enable
Thursday 15 December 2011
vCentre SYSPREP file downloads and locations
Sysprep 1.1 files
Location: C:\Documents and Settings\All Users\Application Data\VMware\VMware VirtualCenter\sysprep\1.1
or:
C:\ProgramData\VMware\VMware vCenter Converter Standalone\sysprep\1.1
Download: [download]
Instructions: Extract the EXE download and copy the contents of the tools folder to the 1.1 folder.
Location: C:\Documents and Settings\All Users\Application Data\VMware\VMware VirtualCenter\sysprep\1.1
or:
C:\ProgramData\VMware\VMware vCenter Converter Standalone\sysprep\1.1
Download: [download]
Instructions: Extract the EXE download and copy the contents of the tools folder to the 1.1 folder.
Windows 2000
Location: C:\Documents and Settings\All Users\Application Data\VMware\VMware VirtualCenter\sysprep\2k
or:
C:\ProgramData\VMware\VMware vCenter Converter Standalone\sysprep\2k
Download: [ SP4 download]
Instructions: Extract the EXE download and then open this file: i386\deploy.cab. Copy the contents of the file to the 2k folder.
Windows 2003
Location: C:\Documents and Settings\All Users\Application Data\VMware\VMware VirtualCenter\sysprep\svr2003
or:
C:\ProgramData\VMware\VMware vCenter Converter Standalone\sysprep\svr2003
Download: [SP2 download]
Instructions: Run the EXE and then open this file: c:\windows\system32\deploy.cab. Copy the contents to the svr2003 folder.
Windows 2003 x64
Location: C:\Documents and Settings\All Users\Application Data\VMware\VMware VirtualCenter\sysprep\svr2003-64
or:
C:\ProgramData\VMware\VMware vCenter Converter Standalone\sysprep\svr2003-x64
Download: [SP2 download]
Instructions: Extract the contents of the EXE and then extract the file SP2QFE\deploy.cab. Copy those files to the svr2003-64 folder.
Windows XP
Location: C:\Documents and Settings\All Users\Application Data\VMware\VMware VirtualCenter\sysprep\xp
or:
C:\ProgramData\VMware\VMware vCenter Converter Standalone\sysprep\xp
Download: [SP2 download]
Instructions: Open the CAB file download and copy the contents to the xp folder.
Location: C:\Documents and Settings\All Users\Application Data\VMware\VMware VirtualCenter\sysprep\xp
or:
C:\ProgramData\VMware\VMware vCenter Converter Standalone\sysprep\xp
Download: [SP2 download]
Instructions: Open the CAB file download and copy the contents to the xp folder.
Windows XP x64
Location: C:\Documents and Settings\All Users\Application Data\VMware\VMware VirtualCenter\sysprep\xp-64
or:
C:\ProgramData\VMware\VMware vCenter Converter Standalone\sysprep\xp-64
Download: [SP2 download]
Instructions: Extract the contents of the EXE and then extract the file SP2QFE\deploy.cab. Copy those files to the xp-64 folder.
VMWare VMKernal ports and over subscription with Equallogic SANs
Previously it was possible to assign multiple VMkernel ports to physical nics. This was called over subscribing and was done to attempt to obtain more bandwidth for the environment especially when the ESX server had 10Gb nics and the SAN was running multiple 1Gb ports. Dell and VMware have changed the support for this practice and now only recommend using a 1:1 VMkernel binding process as described in this updated technical report.
Wednesday 14 December 2011
Error: "Initiator wanted to skip security phase but we cannot." or "Initiator tried to bypass the security phase but we cannot."
This gets me every time I setup an EQL box.
Error: "Initiator wanted to skip security phase but we cannot." or "Initiator tried to bypass the security phase but we cannot."
To fix this open the EQL GUI web interface. Click the iSCSI tab and click Prevent unauthorised hosts from discovering targets.

Error: "Initiator wanted to skip security phase but we cannot." or "Initiator tried to bypass the security phase but we cannot."
To fix this open the EQL GUI web interface. Click the iSCSI tab and click Prevent unauthorised hosts from discovering targets.

Wednesday 30 November 2011
Tuesday 29 November 2011
All OUs in this domain should be protected from accidental deletion
Get-ADOrganizationalUnit -filter * -Properties ProtectedFromAccidentalDeletion | where {$_.ProtectedFromAccidentalDeletion -eq $false} | Set-ADOrganizationalUnit -ProtectedFromAccidentalDeletion $true
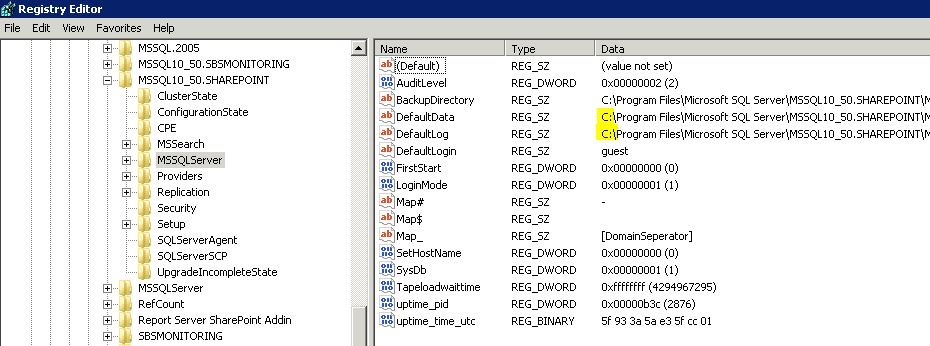
SBS 2011 move SharePoint wizard breaks SharePoint
After installing SBS 2011 you should always use the wizard to move the data files off the system drive elsewhere. I did this with the SharePoint data after patching the server, but later found SharePoint was broken.
After some hacking around I discovered that the crappy wizard had not changed the paths in the registry. I altered these manually, then restarted the server and all was well again.
Thanks Microsoft! Sloppy code!

After some hacking around I discovered that the crappy wizard had not changed the paths in the registry. I altered these manually, then restarted the server and all was well again.
Thanks Microsoft! Sloppy code!
Changing Public Folder replication message priority to urgent in bulk
When you are migrating away from Exchange 2003 to Exchange 2007/2010 you must mive all public folders off from the old server. This is done by using the Move all replicas option under the public folders menu. To speed things up each public folder should have its message priority set to urgent. But what happens if you have 1000's of folders? The solution I found is to use PFDAVadmin which can be found on the Microsoft website. Make sure you have a working backup before you begin. Stopping MSExchangeIS and copying the pub1.edb elsewhere works nicely!
First you need to connect to the Exchange server and AD.


Then click add and select Other folder properties. This process needs repeating for system folders too.

Select Modify and in the property drop-down find PR_REPLICATION_MESSAGE_PRIORITY and enter the value 1
 Next click OK

PFDAVadmin works through the database altering the values. This can take some time if you have lots of folders.

When we inspect the setting on any of the folders you can see the Replication message priority has been altered.

First you need to connect to the Exchange server and AD.

Then select Custom Bulk operation.


Select Modify and in the property drop-down find PR_REPLICATION_MESSAGE_PRIORITY and enter the value 1


PFDAVadmin works through the database altering the values. This can take some time if you have lots of folders.

When we inspect the setting on any of the folders you can see the Replication message priority has been altered.

Tuesday 15 November 2011
Slow network performance on ESXi hosts with link aggregation
I was getting really slow network throughput from all VMs on a 4GB LAG using ESXi 5.0.0 with the IP hash load balancing policy. 250MB file was taking 20 minutes!! This was with a Dell PowerConnect 5524 in a two switch stack. The LAG was configured correctly.
The LAG was up as this command showed.
PowerConnect#sh interface status po1
PowerConnect#conf
PowerConnect(Conf)#interface gi1/0/1-2,gi2/0/1-2
PowerConnect(Conf-if)# spanning-tree portfast
PowerConnect(Conf-if)# channel-group 1 mode on
PowerConnect(Conf-if)# exit
PowerConnect(Conf)#exit
PowerConnect#copy running-config startup-conf
The LAG was up as this command showed.
PowerConnect#sh interface status po1
We tested the connection between the VM and my laptop using iperf
From the VM we ran:
c:\>iperf -s
From my laptop:
c:\>iperf -c 172.x.x.x -i5 -t120 -w1492k
The throughput was not acceptable, giving approx 600Kbps
We broke the stack by pulling power out on the bottom switch and reran the iperf. As you can see things where great again.

Turns out you can't use HDMI 1.3 cables for the stack uplink. It must be HDMI 1.4 which supports EtherLink
The moral of the story is don't use cheap HDMI cables. Thanks to Mike for is input diagnosing this.
Tuesday 9 August 2011
SBS 2011 Migration - Active Directory replication is taking longer than expected
If you encounter this message during setup: “Active Directory replication is taking longer than expected”, do this:
Active Directory replication is taking longer than expected. You can choose whether to continue waiting.If you choose not to wait, the migration may fail. Unless you are sure that replication is working correctly, it is recommended that you continue waiting.
Do you want to wait for the replication to finish? (Yes/No)
Most Common Cause: You will only get this dialog after the SBS setup has waited for 25 minutes and the new server has not been able to properly contact the source DC to initialize the file replication service (FRS), this is preventing the new server from becoming a domain controller. Clicking No on this dialog will almost certainly mean a failed setup. The source server is most likely in journal wrap or having FRS issues.
Resolution Summary: Correct the FRS issues on the source server, do not reboot the new server or close down the setup, leave the popup dialog open while you troubleshoot, once the FRS issues are corrected on the source server, you can open a command prompt on the new server by using Shift-F10 and restart the Netlogon and FRS services, then confirm that SYSVOL and NETLOGON are shared on the new server by using NET SHARE, only then you should click Yes to continue waiting, after 5 minutes the setup will go on.
Wednesday 3 August 2011
Understanding Write Cache Policy
The cache controller writes a block of data to cache memory, which is much faster than writing to the physical disk. The cache controller sends an acknowledgement of data transfer completion to the host system.
Write-Back Versus Write-Through
In write-through caching, the controller sends a data transfer completion signal to the host system when the disk subsystem has received all the data in a transaction.
In write-back caching, the controller sends a data transfer completion signal to the host when the controller cache has received all the data in a transaction. The controller then writes the cached data to the storage device when system activity is low or when the write buffer approaches capacity. The cached data is not written to the storage device immediately.
The risk of using write-back cache is that the cached data can be lost if there is a power failure before it is written to the storage device. This risk is mitigated by using a BBU on selected PERC 6 controllers.
Write-back caching has a performance advantage over write-through caching.
NOTE:
The default cache setting is write-back caching.
NOTE:
Certain data patterns and configurations perform better in a write-through cache policy.
Conditions Under Which Write-Back is Employed
Write-back caching is used under all conditions in which the battery is present and in good condition.
Conditions Under Which Write-Through is Employed
Write-through caching is used under all conditions in which the battery is missing or in a low-charge state. Low-charge state is when the battery is not capable of maintaining data for at least 24 hours in the case of a power loss.
Conditions Under Which Forced Write-Back With No Battery is Employed
Write-Back mode is available when the user selects Force WB with no battery. When Forced Write-Back mode is selected, the virtual disk is in Write-Back mode even if the battery is not present
Wednesday 20 July 2011
Tuesday 19 July 2011
List mailbox sizes is EMS
Get-MailboxStatistics -database “Mailbox Database” | Select DisplayName, LastLoggedOnUserAccount, ItemCount, TotalItemSize, LastLogonTime, LastLogoffTime | Format-Table
Exchange 2010 Setup fails with Property CustomerFeedbackEnabled can't be set on this object because it requires the object to have version 0.1 (8.0.535.0) or later. The object's current version is 0.0 (6.5.6500.0)
Hub transport setup fails on Windows 2008 r2 sp1 DC on a VM with :
Property CustomerFeedbackEnabled can't be set on this object because it requires the object to have version 0.1 (8.0.535.0) or later. The object's current version is 0.0 (6.5.6500.0)
Steps taken to resolve this.
Re-enable IPv6 if it was disabled as part of troubleshooting. IPv6 IS required on a DC running Exchange 2010
Delete the HubTransport key from the registry: HKEY_LOCAL_MACHINE\SOFTWARE\Microsoft\ExchangeServer\v14\HubTransportRole
Uninstall Exchange 2010: setup /m:uninstall
Reboot
Remove any files from c:\program files\Microsoft\exchange\
Remove any traces from HKEY_LOCAL_MACHINE\SOFTWARE\Microsoft\ExchangeServer\
Remove any exchange services from :HKEY_LOCAL_MACHINE\SYSTEM\CurrentControlSet\services
Remove the new exchange server name with ADSI edit
Correct any issues raised my the Microsoft IT environment scanner.
Check AD Schema level is the same on all DCs. http://support.microsoft.com/kb/556086
Check time sync is correct and not syncing with the host if its a VM.
Disable any AV software.
rerun setup from elevated CMD prompt: setup /preparead
rerun setup /m:install /r:ht,mt,ca,mb
This worked for me! Don't forget to create the connectors between the new and old servers if this is a transition from Exchange 2003
Wednesday 29 June 2011
Forcing Kerberos to use TCP
We have been having issues with a 2008 r2 SP1 Hyper-V cluster, the Dell guy told me to set Kerberos to use TCP rather than UDP. This needs doing on all DCs and node in the cluster.
Also check the binding on the hyper-v hosts, make sure the management NIC is first, then the LiveMigration and then the heartBeat.
Reference:
http://support.microsoft.com/kb/244474
- Start Registry Editor.
- Locate and then click the following registry subkey:HKEY_LOCAL_MACHINE\System\CurrentControlSet\Control\Lsa\ Kerberos\ParametersNote If the Parameters key does not exist, create it now.
- On the Edit menu, point to New, and then click DWORD Value.
- Type MaxPacketSize, and then press ENTER.
- Double-click MaxPacketSize, type 1 in the Value data box, click to select theDecimal option, and then click OK.
- Quit Registry Editor.
- Restart your computer.
Also check the binding on the hyper-v hosts, make sure the management NIC is first, then the LiveMigration and then the heartBeat.
Reference:
http://support.microsoft.com/kb/244474
Removing ghost NICs from VMs
After rebuilding a VM in Hyper-V and reusing the old VHD you are left not being able to use the old NIC name and IP address.

To fix this open a CMD prompt with elevated previledges and type in:
set devmgr_show_nonpresent_devices=1
start devmgmt.msc
Once the device manager opens you need to select 'showhidden devices' from the view menu. Expend the Network cards and remove any grayed out NICs.
Reference:
Friday 10 June 2011
VMware - Backing up ESXi configuration
Backing up your ESXi Configuration:
To backup your ESXi configuration you’ll be using the vicfg-cfgbackup.pl command as follows:
Download either the vMA or vCLI
Launch vicfg-cfgbackup.pl:
C:\Program Files\VMware\VMware vSphere CLI\bin>vicfg-cfgbackup.pl –save –server 192.168.15.253 –username root –password password backup.bak
Note: The backup will be stored relative to your user “AppData” path:
C:\Users\Username\AppData\Local\VirtualStore\
Restoring your ESXi Configuration:
Restoring your ESXi config can be done after you have the host up and responding over the network again by using the following:
C:\Program Files\VMware\VMware vSphere CLI\bin>vicfg-cfgbackup.pl –load –server 192.168.15.253 –username root –password password backup.bak
Note: You will be asked to reboot the host on restore.
Wednesday 8 June 2011
Fixing Storage Alignment for Virtual Machines | Tech Blog
A great article on disk alignment.
Also this PDF from NetAPP
Best Practices for File System Alignment in Virtual Environments
A good webpage on alignment
http://msdn.microsoft.com/en-us/library/dd758814(v=sql.100).aspx
Tuesday 7 June 2011
The Autodiscover service could not be contacted.
[PS] C:\>Test-OutlookWebServices | fl
Id : 1013
Type : Error
Message : When contacting https://owa.domain.net/Autodiscover/Autodiscover.xml received the error The remote server returned an error: (401) Unauthorized.
Id : 1006
Type : Error
Message : The Autodiscover service could not be contacted.
You might need to run .\new-TestCasConnectivityUser.ps1 from the scripts to create the test user account needed for the tests.
Fix: http://support.microsoft.com/?id=896861
Wednesday 1 June 2011
Removing Public Folder database during Exchange 2007 to 2010 Transition
During the decommission of Exchange 2007 you need to delete the public folder database on the Exchange 2007 box.
You might see this error:

One solution if you have configured all your replicas correctly is to issues this commands to nuke all public folders allowing the database to be removed.

You might see this error:
One solution if you have configured all your replicas correctly is to issues this commands to nuke all public folders allowing the database to be removed.
Get-PublicFolder -server E2007SERVERNAME “\” -Recurse -ResultSize:Unlimited | Remove-PublicFolder -server E2007SERVERNAME -Recurse -ErrorAction:SilentlyContinueGet-PublicFolder -Server E2007SERVERNAME “\Non_Ipm_Subtree” -Recurse -ResultSize:Unlimited | Remove-PublicFolder -Server E2007SERVERNAME -Recurse -ErrorAction:SilentlyContinueAfter I nuked the PFs I got this error from the EMC:
The solution is to remove the public folder database from the Exchange 2010 EMS, first get the 'idenitiy' of the public folder database from the Exchange 2007 server by issuing this command.
Get-PublicFolderDatabase -Server EXCH07 | fl name, identityOnce you have the output you can issue this command on the 2010 EMS
Remove-PublicFolderDatabase "EXCH07\Second Storage Group\Public Folder Database"Now you can remove Exchange 2007 via the add/remove control panel.
How to install Exchange Server 2007 SP3 on a computer that is running Windows SBS 2008:http://support.microsoft.com/kb/982423
Thursday 26 May 2011
Windows 2008r2 with SP1 download URL - 180 day trial
This avoids the registration process which doesn't seem to like ie9
Tuesday 24 May 2011
Office 2010 Backup media download URL
http://office.microsoft.com/en-us/products/microsoft-office-2010-backup-FX101853122.aspx
Tuesday 17 May 2011
force the default multipathing policy to Round Robin in vSphere 4
esxcli nmp satp setdefaultpsp –satp VMW_SATP_DEFAULT_AA –psp VMW_PSP_RR
esxcli nmp satp setdefaultpsp –satp VMW_SATP_EQL –psp VMW_PSP_RR
esxcli corestorage claimrule load
esxcli corestorage claimrule run
esxcli nmp satp setdefaultpsp –satp VMW_SATP_EQL –psp VMW_PSP_RR
esxcli corestorage claimrule load
esxcli corestorage claimrule run
Enabling copy and paste in vSphere client
Starting with vSphere 4.1, the Copy and Paste options are, by default, disabled for security reasons.
To be able to copy and paste between the guest operating system and the remote console, you must enable the Copy and Paste options using the vSphere Client. Alternatively, you can use RDP (Remote Desktop Protocol) to connect to the Windows virtual machines.
To enable this option for a specific virtual machine:
- Log into a vCenter Server system using the vSphere Client and power off the virtual machine.
- Select the virtual machine and click the Summary tab.
- Click Edit Settings.
- Navigate to Options > Advanced > General and click Configuration Parameters.
- Click Add Row and type the following values in the Name and Value columns:
- isolation.tools.copy.disable – false
- isolation.tools.paste.disable – false
Note: These options override any settings made in the VMware Tools control panel of the guest operating system.
- Click OK to close the Configuration Parameters dialog, and click OK again to close the Virtual Machine Properties dialog.
- Power on the virtual machine.
Note: If you vMotion a virtual machine to a host where the isolation.tools.*="FALSE" is already set, the copy and paste options are automatically activated for that virtual machine.
To enable this option for all the virtual machines in the ESX/ESXi host:
- Log in to the ESX/ESXi host as a root user and open the /etc/vmware/config file using a text editor.
- Add these entries to the file:
isolation.tools.copy.disable="FALSE"
isolation.tools.paste.disable="FALSE"
- Save and close the file. The Copy and Paste options are only enabled when the virtual machines restart or resume the next time.
Note: These options do not persist after an upgrade. If you upgrade to a newer version after enabling these options, the changes are lost and you may have to re-enable them.
Note: An RDP session to Windows virtual machines lets you copy and paste.
Tuesday 10 May 2011
Comparing the Dell, Force 10 and other vendors switches for iSCSI
Comparing the Dell PowerConnect 54xx, 55xx, 62xx and 70xx switches for iSCSI
Mpps = Million Packets Per Second
5424 Performance
Switch Fabric Capacity 48.0 Gbps
Forwarding Rate 35.6 Mpps
Up to 8,000 MAC Addresses
64MB of CPU DRAM
16MB of Flash Memory
2Mb Packet Buffer Memory
5524 Performance
Switch Fabric Capacity 128.0 Gbps
Forwarding Rate 65.47 Mpps
Up to 16,000 MAC Addresses
1GB of CPU DRAM
16MB of Flash Memory
12Mb Packet Buffer Memory
6224 Performance
Switch Fabric Capacity 136 Gb/s
Forwarding Rate 95 Mpps
Up to 8,000 MAC Addresses
256MB of CPU SDRAM
32MB of Flash Memory
?? Packet Buffer Memory
6348 Performance
Switch Fabric Capacity 184 Gb/s
Forwarding Rate 160 Mpps
Up to 8,000 MAC Addresses
512MB of CPU SDRAM
64MB of Flash Memory
?? Packet Buffer Memory
7024 Performance
Switch Fabric Capacity 176.0 Gbps
Forwarding Rate 125 Mpps
Up to 32,000 MAC Addresses
1GB of CPU DRAM
64MB of Flash Memory
32Mb Packet Buffer Memory
7048 Performance
Switch Fabric Capacity 176.0 Gbps
Forwarding Rate 160 Mpps
Up to 32,000 MAC Addresses
1GB of CPU DRAM
64MB of Flash Memory
32Mb Packet Buffer Memory
7048R Performance
Switch Fabric Capacity 224.0 Gbps
Forwarding Rate 160 Mpps
Up to 32,000 MAC Addresses
1GB of CPU DRAM
64MB of Flash Memory
32Mb Packet Buffer Memory
Force 10 s4810
Switch Fabric Capacity 1.28 Tbps
Forwarding Rate 960 Mpps
Up to 128,000 MAC Addresses
2GB of CPU DRAM
9Mb Packet Buffer Memory
Force 10 MXL
Switch Fabric Capacity 1.28 Tbps
Forwarding Rate 960 Mpps
Up to 128,000 MAC Addresses
2GB of CPU DRAM
9Mb Packet Buffer Memory
Force 10 s60
Switch Fabric Capacity 176 Gbps
Forwarding Rate 132 Mpps
Up to 32,000 MAC Addresses
?GB of CPU DRAM
1.25Gb Packet Buffer Memory
Cisco 3750G
Switch Fabric Capacity 32.0 Gbps
Forwarding Rate 38.7 Mpps
Up to 12,000 MAC Addresses
? of CPU DRAM
128MB of Flash Memory
8Mb Packet Buffer Memory*
Cisco Nexus 5548p
Switch Fabric Capacity 160.0 Gbps
Forwarding Rate 714.24 Mpps (Layer 2)
Up to 32,000 MAC Addresses
32Mb Packet Buffer Memory*
Cisco 3750X-24S
Switch Fabric Capacity 160.0 Gbps
Forwarding Rate 65.5 Mpps
Up to 12,000 MAC Addresses
? of CPU DRAM
128MB of Flash Memory
?Mb Packet Buffer Memory*
Brocade FCX648S
Switch Fabric Capacity 200 Gbps
Forwarding Rate 150 Mpps
Up to 32,000 MAC Addresses
?GB of CPU DRAM
?Mb Packet Buffer Memory
Basically the faster frame forwarding rate and the higher the port buffer the better, which is how you gauge a good switch.
*0.75MB of ingress buffering is dynamically divided into port
buffers/queues, 2 of which are user-configurable. There's 2MB of
egress buffering that provides 4 egress queues per physical port.
Monday 21 March 2011
Slow mouse performance on Windows 2008 R2 virtual machine
Troubleshooting SVGA drivers installed with VMware Tools on Windows 7 and Windows 2008 R2 running on ESX 4.0
■You receive a black screen on the virtual machine when using Windows 7 or Windows 2008 R2 as a guest operating system on ESX 4.0.
■You experience slow mouse performance on Windows 2008 R2 virtual machine.
Solution
This issue can occur due to the XPDM (SVGA) driver provided with VMware Tools. This is a legacy Windows driver and is not supported on Windows 7 and Windows 2008 R2 guest operating systems.
To resolve this issue, update to ESX 4.0 Update 1. A new WDDM driver is installed with the updated VMware Tools and is compatible with Windows 7 and Windows 2008 R2.
Note: After a VMware Tools upgrade, the driver files are located in.
C:\Program Files\Common Files\VMware\Drivers\wddm_video.
Monday 14 March 2011
Dell R610 - Tylersburg chipset stepping for Westmere processors
Tylersburg chipset stepping for Westmere processors
Introduction of the new Intel Xeon 5600 series (Westmere-EP) processors includes a stepping revision of the Intel 5520 and 5500 chipset from ‘B3’ to ‘C2’. This stepping revision is required to enable the full Xeon 5600 processor feature set. Dell servers shipped with the new chipset revision will have the symbol II in the BIOS System Revision Field, which is visible through Open Manage Server Administrator (OMSA) and the iDRAC GUI. In addition, these servers will be physically marked with a 12mm wide by 6mm tall rectangular label containing the symbol “II” will be. They will be white characters on a black background.
The II symbol also identifies R610 servers with system boards that support 130W processors. 130W processors on R610 require a unique heatsink.PowerEdge R610 (Thidwick) Sourcebook Dell Confidential – For Internal Use Only 35
Intel Xeon 5600 series processors will work in existing systems built for Intel Xeon 5500 series (Nehalem-EP), however the full feature set including AES-NI encryption and Intel TXT will only be available in newly manufactured systems which include the new Westmere-EP (C2) stepping of the system chipset. In addition, existing systems will not support the top bin 130W Xeon 5600 processors.
A BIOS and iDRAC update to current versions are required before installing 5600 series processors in systems originally shipped with Nehalem EP 5500 series processors.
Wednesday 23 February 2011
Reduce size of SOPHOS4 SQL database
1. Install Microsoft SQL Management Studio Express
2. Open Sophos DB
3. Confirm DB that is using space.
Right Click DB go to properties, Check Size
4. Once you find the Sophos DB using disk space open its properties page.
5. Click on Options
6. Change Recover Model to Simple
7. Click Ok
8. Create Backup of DB
• Right click DB
• Select task
• Select backup
• Set backup type full
• Change backup to Disk
• Add location do save the backup file
• Click ok
9. Next Shrink the DB
• Right click DB
• Select Tasks
• Select Shrink
• Select Database
optional Tick Reorganize files before releasing unused space….
• Select OK
This will shrink the DB down. My Sophos DB change from 2.5 GB to 25Mb.
Thanks to
http://community.sophos.com/t5/Sophos-Small-Business-products/Size-of-SOPHOS4-log-LDF/m-p/2374
Saturday 12 February 2011
Subscribe to:
Posts (Atom)